Cooling equipment plays a vital role in keeping homes, businesses, and industrial facilities comfortable during hot weather. From portable air conditioners to large cooling towers, these systems remove heat and humidity from indoor spaces. The right cooling equipment can lower energy costs, improve air quality, and maintain safe temperatures for people and equipment.
According to the U.S. Environmental Protection Agency (EPA), air conditioning accounts for approximately 19% of the total electricity used in U.S. homes, making energy-efficient cooling equipment a key factor in managing utility costs.
Modern cooling systems come in many forms to meet different needs. Homeowners might choose central air conditioning units or portable spot coolers for temporary use. Businesses often need larger systems like chillers, cooling towers, or industrial evaporators to handle bigger spaces and higher heat loads.
This guide covers what sewer line inspections include, how to prepare your property, what to expect during the process, costs and timing, and whether these inspections provide good value for homeowners.
In this article, you’ll learn how to choose the right cooling equipment for your home based on system types, sizing, and efficiency.
Here’s what you’ll find below.
- What a sewer line inspection covers and why it helps
- How to prepare your home before the visit
- What happens during a sewer line inspection
- Cost, timing, and how often to inspect
- Is it worth getting a sewer line inspection
Keep reading! Understanding your cooling needs helps you pick the best equipment for your situation.
What a sewer line inspection covers and why it helps
A sewer line inspection uses special cameras to check pipes for damage and blockages. Technicians create detailed reports that show exactly what problems exist and where they are located.
Sewer camera inspection basics, what techs look for
Technicians start a sewer inspection at the home's cleanout access point. This removable cover gives direct access to the main sewer line that connects the house to the municipal system.
High-definition cameras mounted on flexible cables travel through the pipes. These cameras can bend around corners and navigate the entire sewer system without digging.
The technician controls the camera from above ground. They watch a live video feed that shows the inside condition of every pipe section.
During the inspection, techs look for several key issues:
- Pipe damage like cracks or breaks
- Tree root intrusion that blocks flow
- Grease buildup on pipe walls
- Pipe bellies where sections have sagged
The camera also measures distances. This helps pinpoint exactly where problems are located on the property.
Common issues found, roots, bellies, cracks, and grease
Tree roots cause some of the most serious sewer problems. Roots grow into small cracks seeking water and nutrients. They can completely block pipes over time.
Pipe bellies happen when sections of sewer line sag or dip. Water and waste collect in these low spots instead of flowing freely. This creates ongoing drainage problems.
Cracks and breaks in pipes allow sewage to leak into the surrounding soil. These breaks also let dirt and debris enter the sewer system.
Grease buildup coats the inside of pipes and reduces their diameter. Kitchen grease hardens inside sewer lines and traps other debris.
Issue Type
Typical Cause
Repair Method
Tree roots
Roots seeking water
Root removal, pipe lining
Pipe bellies
Soil settling, poor installation
Pipe replacement
Cracks
Age, ground movement
Pipe lining, spot repairs
Grease buildup
Kitchen waste
Hydro jetting, cleaning
Sewer scope video and report, how they inform next steps
The inspection creates a complete video record of the sewer line condition. Technicians provide this video along with a written report that details all findings.
The report includes specific locations of problems measured from the cleanout. It also rates the severity of each issue found.
Photos from key sections help homeowners understand what repairs are needed. The report explains whether problems require immediate attention or can wait.
Cost estimates often accompany inspection reports. Basic inspections typically cost $100 to $300. Repair costs vary widely based on the problems found.
This documentation helps homeowners make informed decisions. They can plan for necessary repairs and budget accordingly. The video also serves as proof of pipe condition for insurance or warranty claims.
How to prepare your home before the visit
Getting ready for a cooling equipment service visit requires clearing pathways, stopping water-heavy activities, and collecting maintenance records. These steps help technicians work faster and spot problems more easily.
Clear access to cleanouts and remove nearby obstacles
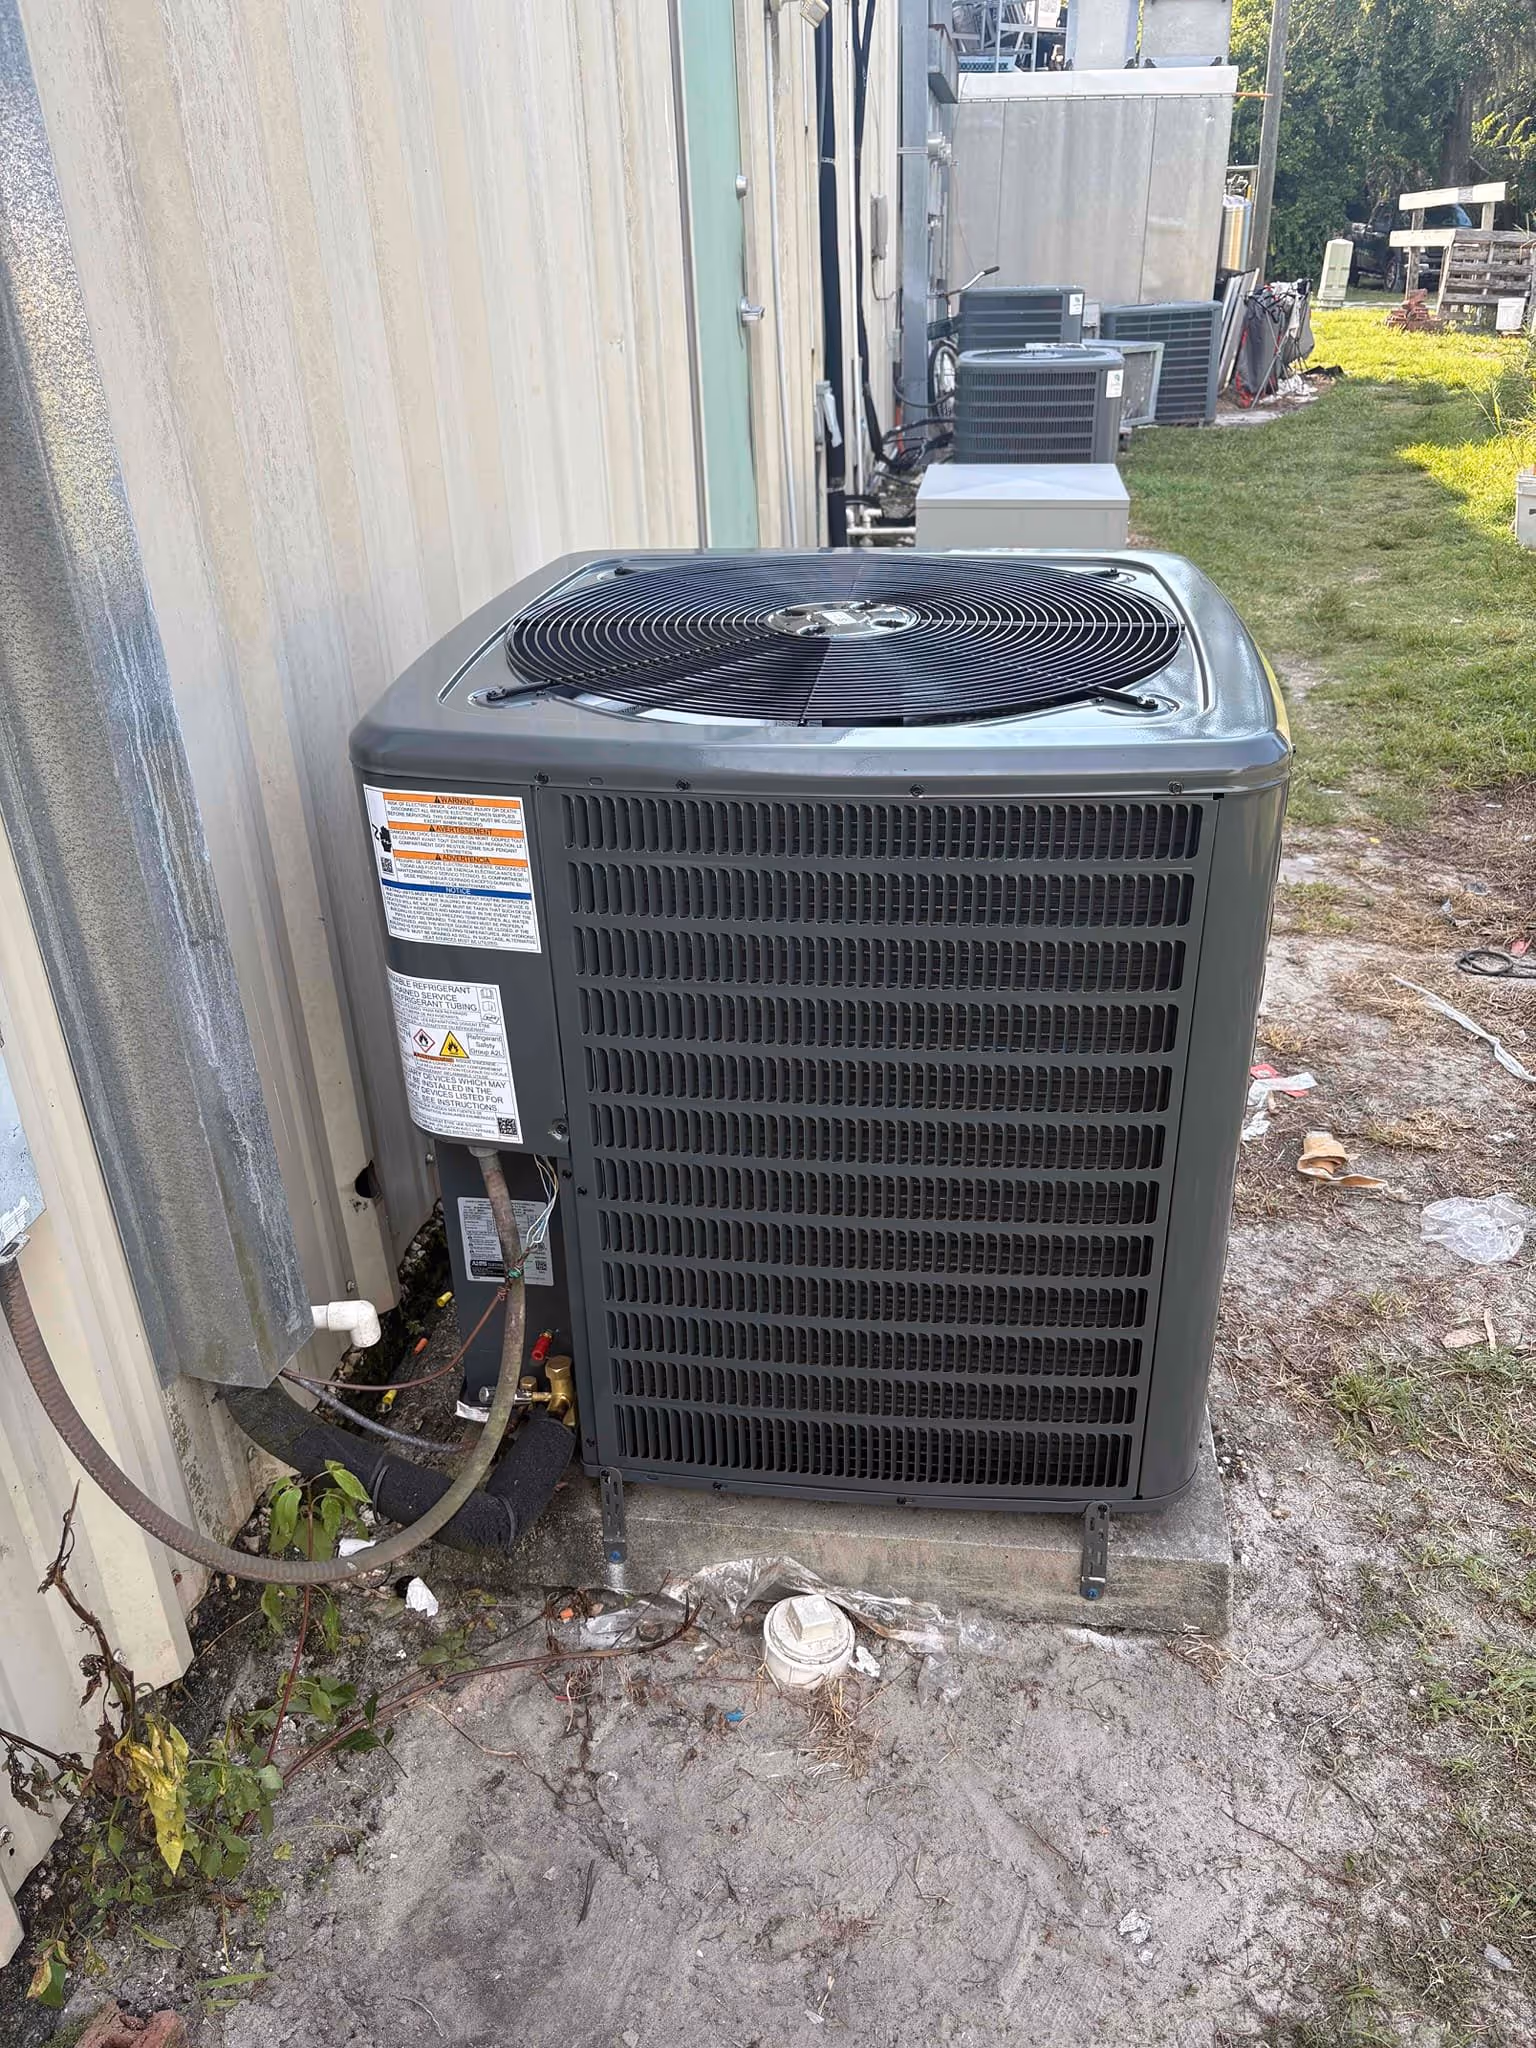
Technicians need clear paths to reach all parts of the cooling system. Move furniture, storage boxes, and decorations away from indoor units, outdoor condensers, and electrical panels.
Check that gate latches work properly if the outdoor unit sits in a fenced area. Unlock any gates or doors the technician might need to use. Trim bushes and plants around the outdoor condenser to create at least three feet of clearance on all sides.
Remove items stored near air handlers in basements, attics, or closets. This includes holiday decorations, cleaning supplies, and boxes. Clear a path that is at least four feet wide leading to the equipment.
Make sure outdoor walkways are safe and well-lit. Sweep away leaves, snow, or debris from paths. If work happens during evening hours, turn on porch lights and pathway lighting.
Pause laundry, dishwashers, and heavy water use
Stop using appliances that create heat or humidity at least two hours before the technician arrives. This includes dishwashers, washing machines, dryers, and ovens.
Heavy water use can affect system pressure readings and make diagnosis harder. Ask family members to avoid long showers or baths during the service visit. Turn off sprinkler systems that run near the outdoor unit.
The technician needs accurate temperature and humidity readings throughout the home. Running heat-producing appliances can skew these measurements and lead to wrong conclusions about system performance.
Keep the thermostat at normal settings. Do not adjust it right before the visit or try to show problems by changing temperatures quickly.
Gather past repairs and permit info for faster diagnosis
Collect all paperwork related to previous cooling system work. This includes repair receipts, warranty cards, installation permits, and maintenance records.
Create a simple list of recent problems or changes in system performance. Note dates when issues started and what symptoms occurred. Include details like unusual noises, weak airflow, or higher energy bills.
Important documents to have ready:
- Installation permits and inspection certificates
- Warranty information for equipment and parts
- Previous repair invoices with part numbers
- Annual maintenance records
- Energy bills showing usage changes
Take photos of error codes or warning lights that appear on the system before the technician arrives. Many codes reset when power cycles, so pictures help preserve diagnostic information.
Write down questions about system performance or energy efficiency. Having a list ready ensures important topics get covered during the visit.
What happens during a sewer line inspection
A sewer line inspection uses specialized camera equipment to examine pipes for damage, blockages, and other problems. The process involves setting up cameras, locating issues, and reviewing footage to create repair recommendations.
Camera for drain pipe setup, entry points, and push distance
The plumber sets up specialized camera equipment before starting the inspection. This equipment includes a waterproof camera attached to a flexible cable. The camera connects to a monitor that shows live footage.
Common entry points include:
- Cleanout access ports
- Toilet drain connections
- Floor drains
- Outside sewer connections
The technician chooses the best entry point based on the home's layout. They insert the camera slowly into the pipe. Most residential cameras can travel 100 to 300 feet through the sewer line.
The camera records everything as it moves through the pipe. The flexible cable allows it to navigate bends and turns. LED lights on the camera help illuminate dark pipe interiors.
The technician controls the camera's speed and direction. They can stop to examine problem areas more closely. The push distance depends on pipe length and any blockages found.
Locating problem spots, marking depths and offsets
The technician watches the monitor carefully as the camera moves through the pipe. They look for cracks, breaks, tree roots, and blockages. When problems appear on screen, they mark the exact location.
Common issues found during inspections:
- Tree root intrusion
- Pipe corrosion and deterioration
- Blockages from debris
- Pipe misalignment or shifting
- Joint separations
The equipment measures how far the camera has traveled from the entry point. This gives the exact depth of any problems found. The technician also notes offset measurements from reference points above ground.
Modern equipment can pinpoint problems within inches of their actual location. Some systems use transmitters to mark spots above ground. This helps later when repairs are needed.
The technician takes still photos of major problems. They also record video footage of the entire inspection. All measurements and locations get documented for the final report.
Post-inspection walkthrough, video review and recommendations
After completing the camera inspection, the technician reviews all footage with the homeowner. They explain what each problem means and how serious it is. The video shows exactly what's happening inside the pipes.
The technician creates a detailed report listing all issues found. This report includes photos, measurements, and location details. It also explains the condition of the entire sewer line system.
The final report typically includes:
- Problem descriptions and severity levels
- Exact locations and depths
- Repair cost estimates
- Recommended timeline for fixes
- Preventive maintenance suggestions
Minor issues might need simple cleaning or small repairs. Major problems could require pipe replacement or extensive work. The technician explains all options available to fix each problem.
The homeowner gets copies of all video footage and reports. This documentation helps when getting repair quotes from contractors. It also provides proof of pipe conditions for insurance or warranty claims.
Cost, timing, and how often to inspect
Professional cooling equipment inspections typically cost $200-400 per visit, with timing dependent on equipment type and usage patterns. Most systems need annual inspections, though commercial units may require more frequent checks.
How much it costs to get a sewer line inspected, what changes price
Basic cooling equipment inspections range from $200 to $400 for standard residential systems. Commercial units cost more due to complexity and size.
Factors that increase inspection costs:
- System size and complexity
- Number of units requiring inspection
- Location accessibility
- Additional testing requirements
- Emergency or after-hours service
Industrial cooling towers and large commercial chillers can cost $500 to $1,500 to inspect. The price includes checking refrigerant levels, electrical connections, and mechanical components.
Multiple units at one location often qualify for package pricing. Some companies offer maintenance contracts that reduce per-visit costs.
Typical timeline from arrival to final report
Standard residential cooling system inspections take 1 to 2 hours to complete. The technician arrives, performs visual checks, and tests system performance.
Inspection timeline breakdown:
- Initial assessment: 15-30 minutes
- Component testing: 30-60 minutes
- Performance evaluation: 15-30 minutes
- Documentation: 15-30 minutes
Commercial systems require 2 to 4 hours depending on size. Complex industrial equipment may need full-day inspections.
Most companies provide verbal findings immediately after inspection. Written reports arrive within 24 to 48 hours via email or mail.
How often a sewer line should be inspected for older homes or before a sale
Residential cooling systems need annual inspections before peak season. Spring timing works best since it prepares equipment for heavy summer use.
Commercial systems benefit from twice-yearly inspections. One occurs before summer cooling season and another before winter heating demands.
Inspection frequency by system type:
- Home air conditioners: Once yearly
- Commercial HVAC: Twice yearly
- Cooling towers: Monthly visual checks, annual professional inspection
- Industrial chillers: Quarterly or bi-annually
Heavily used systems need more frequent attention. Equipment over 10 years old requires closer monitoring for wear and efficiency loss.
Emergency inspections become necessary when unusual noises, reduced cooling, or higher energy bills occur between scheduled visits.
Is it worth getting a sewer line inspection
A sewer line inspection helps homeowners avoid costly surprises by identifying problems before they require expensive emergency repairs. The process works best when combined with regular maintenance and provides detailed documentation of pipe conditions.
Avoiding surprise dig-ups with a simple scope first
A sewer scope inspection uses a specialized camera to examine pipes from the inside without digging. This method reveals blockages, cracks, and root intrusion before they become major problems.
The camera travels through the sewer lateral, which connects the house to the main sewer line under the street. Plumbers can spot collapsed sections, breaks, and clogs that would otherwise require excavation to discover.
Early detection saves money by catching issues when repairs are still manageable. A small crack found during inspection costs much less to fix than a complete pipe replacement after a collapse.
Cold weather makes existing sewer problems worse. Small cracks can expand when temperatures drop, turning minor issues into emergency situations that require immediate attention.
The inspection creates a baseline record of pipe conditions. Homeowners can track changes over time and plan maintenance schedules based on actual pipe deterioration rather than guesswork.
When to pair a scope with cleaning or hydro jetting
Combining sewer line inspection with cleaning services maximizes the value of both procedures. The camera inspection shows exactly where problems exist, making cleaning more targeted and effective.
Before cleaning: The scope identifies the type and location of blockages. Tree roots, grease buildup, and debris each require different removal methods for best results.
After cleaning: A follow-up camera inspection confirms that all blockages are gone and reveals any damage that was hidden behind the debris.
Hydro jetting works well for removing stubborn blockages but can damage already weakened pipes. The initial scope inspection shows which sections can handle high-pressure water cleaning safely.
Regular maintenance schedules benefit from this combined approach. Properties with mature trees or older pipes need more frequent attention than newer installations.
Ready for clear footage and a written report, book a same-day sewer scope
Professional sewer inspections provide video footage and detailed written reports documenting pipe conditions. Most companies offer same-day service for urgent situations.
The video shows the exact location and severity of problems using distance markers. Technicians can pinpoint issues to within a few feet, making repairs more efficient.
Written reports include:
- Problem locations with measurements
- Recommended repair priorities
- Cost estimates for different solutions
- Photos or video stills showing damage
Push cameras work for most residential inspections and fit through standard drain openings. Larger properties may need specialized equipment for longer pipe runs.
Emergency inspections help during home purchases or when problems appear suddenly. The documentation helps homeowners make informed decisions about repairs and provides evidence for insurance claims when applicable.
Conclusion
Cooling equipment plays a vital role in keeping systems running smoothly across many industries. These systems help protect expensive machinery and create comfortable environments for people.
The cooling industry continues to develop new solutions. Smart systems now adjust temperatures automatically. Phase-change cooling provides better heat removal. Water-based systems offer reliable performance for heavy-duty applications.
Different industries need different cooling approaches. Data centers require precise temperature control. Manufacturing plants need robust industrial systems. Commercial buildings benefit from smart climate control.
Regular maintenance keeps cooling systems working well. Clean filters improve airflow. Proper water treatment prevents buildup. Routine inspections catch problems early.
The future of cooling equipment focuses on three main areas. Energy efficiency reduces power costs. Environmental sustainability protects the planet. Advanced technology improves system performance.
Businesses that invest in quality cooling equipment see real benefits. Their systems last longer and work better. Energy costs stay lower over time.
Cooling technology will keep advancing as needs change. The EPA reports a steady rise in cooling degree days across the U.S., reflecting a growing need for reliable cooling systems as climate patterns shift and summers become hotter. New materials and designs will make systems even better. The focus remains on balancing performance, cost, and environmental impact.
Proper cooling equipment selection depends on specific needs and conditions. Working with experienced professionals helps ensure the right choice for each application.
Schedule your cooling equipment inspection or installation today to ensure optimal comfort and energy efficiency in your home.


.svg)